RV decals can be annoying. Sometimes you want a clean slate and other times you simply want to remove all that annoying dealer stickers. In our case, we wanted to add some of our own decals and they were going to go where all the Jayco Eagle words were. Removing these decals was actually a lot easier than I thought.
I understand that results may vary based on your rig, the type of outer shell, etc. So it is important to understand our situation as it may be a different experience for you. If you do remove decals from your RV make sure to leave a comment below.
What worked for you?
What result were you able to achieve?
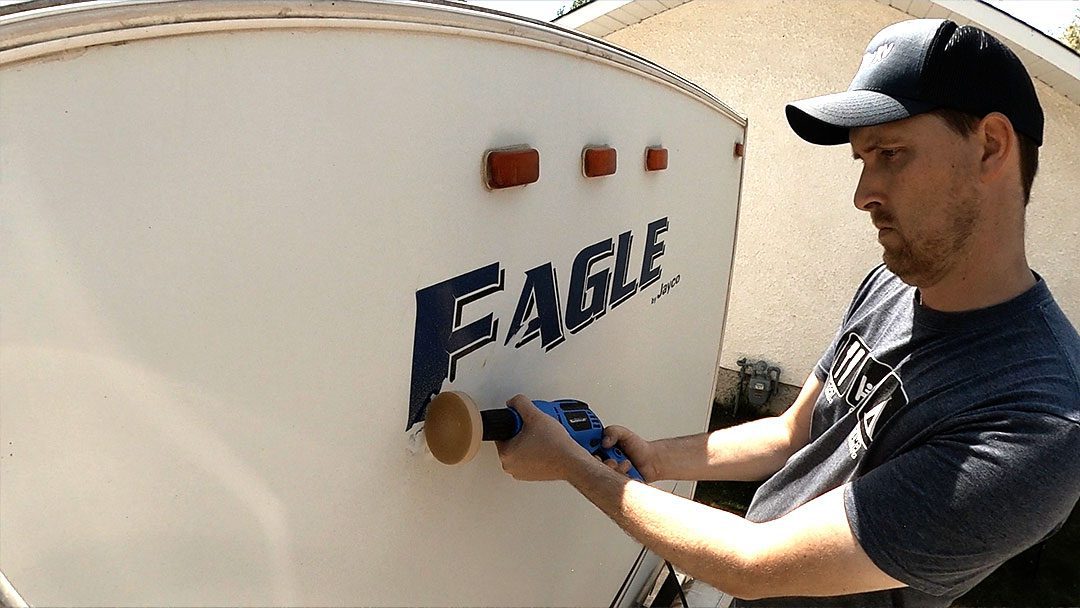
We have a 2005 Jayco Eagle with a fiberglass outer shell. Our rig has been mostly outside and the sides have been baked by the sun. This is important to know as I am sure that if our rig was kept inside the walls would be brighter and decals would come off easier.
The first decal that we removed was from the side. The previous owner had their name on the side and we wanted to remove it. To take this one off we used a combination of a heat gun and a razor edge. This combination worked pretty well. It was time-consuming and required you to be quite careful so as not to nick the camper shell.
After removing the decal we were left with a sticky residue that we then used goo be gone on the residue, however, it didn’t want to remove it. Finally, once it had some time to dry, we went back with a razor edge again and were able to scrape off the residue and we had a clean surface.

The other option we have tried is a Wonder Wheel. You can find it on Amazon here – https://amzn.to/3QOBAYH This is basically an eraser at the end of a drill. I recommend using a corded drill as this is a great way to burn out your battery-powered drill.
By using the Wonder Wheel it is very easy to remove the decal. It does get a little hot and can be hard on the arms when you are removing larger decals. Once you are done you will end up with a lot of rubber residue that you can wipe off. This is the same as what you would get when you erase something on a piece of paper and you have little eraser bits on the page.
We did find that the wheel did leave what looked like burn marks on the side of the camper. This was temporary though and vanished shortly thereafter.
The result of this method was very good. In our case, we still had a hint of the decal when you look at the camper from various angles. We were not concerned about this as we were covering it up with our own decal later on.
This result could be due to the fact that the shell was protected by the decal and we are looking at the original shine of the camper, or it was because there was still a layer of the decal still there. Perhaps the original sticky layer. It is really hard to tell.
Our result in the end though is that the decal has been removed by both methods. You will have to experiment with what works best on your rig.
If you have tried something else please let us know in the comments below as we would love to hear about new and better methods for removing decals from your RV.

Over the years we have done a lot of stupid things. Mistakes happen. However, sometimes there are mistakes that happen that you cannot be prepared
RV decals can be annoying. Sometimes you want a clean slate and other times you simply want to remove all that annoying dealer stickers. In
When the weather gets cold and temperatures dip below freezing you have to take steps to protect your RV. Ensuring that you properly winterize my
Today, we’re doing something weird and strange. We’re sick of the way that our rims look, they look rusty. And I’m sure you could do
2 Responses
How did you remove the burn marks after using the rubber wheel?
Thanks,
Max
Hey Max, we found that our “burns” disappeared shortly after. However, if you are careful you can avoid them. Did you end up getting some burns with yours?